


Jump to:
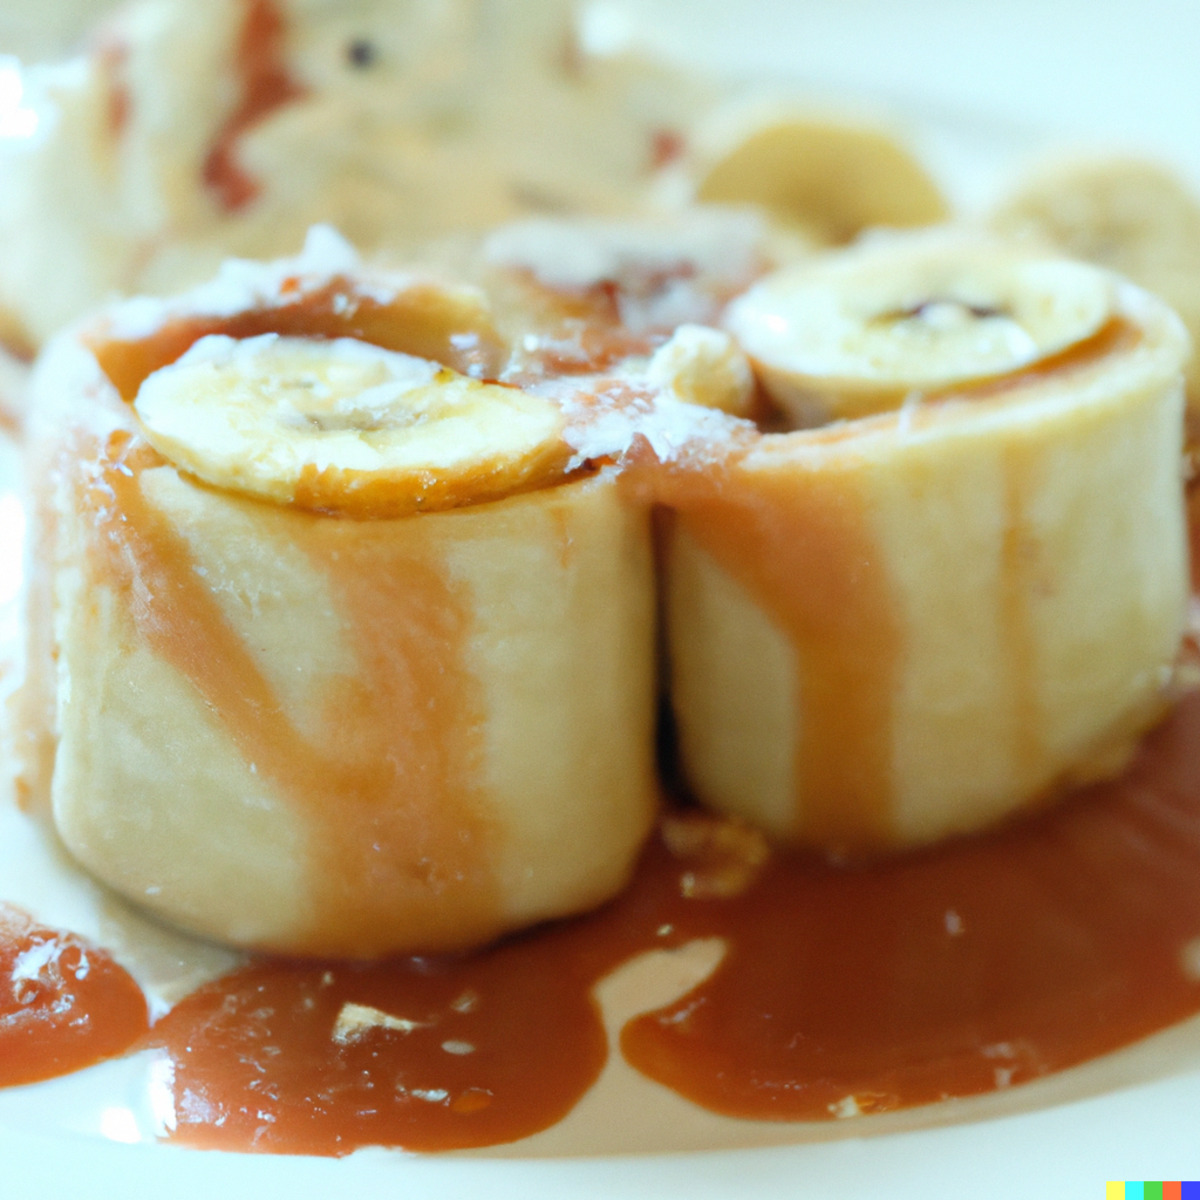
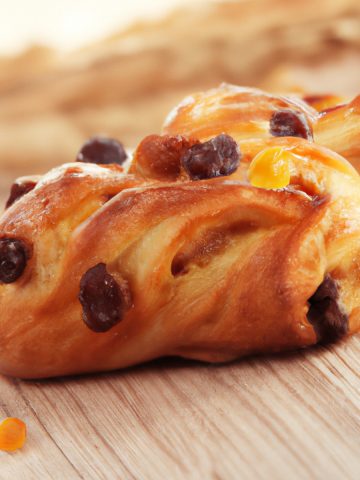
I can't wait for you to try these Butter Banana Rolls. It's a delectable treat that's perfect for both breakfast and dessert. Imagine biting into a roll that's got the richness of butter, the sweetness of ripe bananas, and a sprinkle of cinnamon, all held together by soft, fluffy dough. It's a cozy, homemade dish that's sure to warm your heart and satisfy your sweet tooth.
Making these rolls is like a mini-adventure in the kitchen. You'll start by preparing a simple yeast dough that rises to pillowy perfection. Then, you'll craft a luscious filling of mashed bananas, melted butter, and aromatic cinnamon. Roll it all up, slice, bake, and finally, drizzle with a sweet vanilla glaze. The end result is so mouth-watering, you'll wonder why you haven't made it sooner. Trust me, this is one recipe you'll want to keep handy for special occasions or just because.
Instructions for Perfect Butter Banana Bread
- Start with the Dough: First, I grab a large mixing bowl and pour in one cup of warm milk, aiming for about 110°F (43°C). I sprinkle in one package of active dry yeast and ¼ cup of granulated sugar. Stirring lightly, I let the mixture sit undisturbed for about 5 minutes. When it turns frothy and bubbly on top, I know my yeast is good to go.
- Add the Goodies: Now, it's time to enrich that yeast mixture. I melt ¼ cup of unsalted butter and beat one egg. Adding both to the yeast mixture, along with a ½ teaspoon of salt, I use a hand whisk to mix them all together. It starts to look like a creamy soup at this point.
- Mixing in Flour: Gradually, I add 4 cups of all-purpose flour to the liquid ingredients. I usually add a cup at a time, mixing in between each addition to make it easier to incorporate. I continue mixing until it forms a dough that's too thick to stir.
- Kneading Time: I generously flour a clean countertop and plop the dough onto it. Kneading involves folding the dough over itself and using the heel of my hands to push it down and away. I keep kneading until the dough is smooth and elastic, which takes about 5-10 minutes.
- Let it Rise: I place the kneaded dough back into the mixing bowl, which I've lightly greased to prevent sticking. I cover it with a damp kitchen towel and find a warm, draft-free spot for it to sit for about 1 to 1.5 hours. The dough should double in size during this time.
- Prep the Oven and Pan: I don't forget to preheat my oven to 350°F (175°C). I also line a 9x13-inch baking pan with parchment paper, ensuring that the paper hangs over the edges a bit, making it easier to lift out the rolls later.
- Filling Time: In a medium-sized bowl, I peel and mash three ripe bananas. To this, I add ½ cup of melted unsalted butter, 1 cup of brown sugar, and 2 teaspoons of cinnamon. Stirring thoroughly, I make sure everything is well mixed.
- Roll and Fill: With the dough doubled in size, I punch it down lightly to remove air bubbles. Then, I turn it out onto my floured surface again and roll it into a rectangle, aiming for dimensions of about 12x18 inches. I evenly spread my prepared banana filling all over the dough, leaving a small border around the edges.
- Make the Rolls: Starting from one of the long edges, I roll the dough tightly into a log. I make sure the seam side is down when I finish rolling. Using a serrated knife, I cut the log into 12 equal pieces, trying to make each slice about 1.5 inches thick.
- Into the Pan: One by one, I place each roll into my lined baking pan. I set them about an inch apart so they have room to expand but can still support each other as they rise and bake.
- Bake: I slide the pan into my preheated oven on the middle rack, letting them bake for about 25-30 minutes. I check for a lovely golden-brown color on top, which tells me they're baked to perfection.
- Glaze Time: While the rolls bake, I create the glaze. In a small bowl, I whisk together 1 cup of powdered sugar, 2 tablespoons of milk, and 1 teaspoon of vanilla extract. The consistency should be smooth and pourable.
- The Finishing Touch: As soon as those golden-brown rolls come out of the oven, I generously drizzle the glaze all over them. The heat from the rolls makes the glaze ooze into every nook and cranny, making them even more delicious.
Tips and Tricks Banana Roll
Yeast Test: It's crucial to ensure your yeast is active for the dough to rise properly. To do this, mix the yeast with warm milk and sugar, and let it sit for about 5 minutes. You should see a frothy, bubbly layer form on top. If nothing happens, it's a clear sign your yeast is inactive. Always store your yeast in a cool, dark place to extend its lifespan.
Banana Ripeness: The state of your bananas can make or break the filling. Ripe bananas not only provide natural sweetness but also a smoother texture when mashed. If your bananas are green or just not ripe enough, they won't mash well and the flavor will be less sweet and more starchy.
Rolling the Dough: This is a crucial step in achieving that perfect roll texture. Make sure your surface is well-floured to avoid sticking, and aim for a uniform thickness as you roll out the dough. A non-uniform dough could result in rolls that bake unevenly—some parts might be doughy while others might become too dry.
Cutting the Rolls: Use a serrated knife or a pizza cutter for a clean, even cut. Uneven or crushed edges can result in rolls that don't hold their shape well during baking. If using a knife, make sure to use a gentle sawing motion instead of pressing down hard, which can deflate your rolls.
Check Doneness: To ensure your rolls are fully baked, insert a toothpick into one of the middle rolls after the baking time is up. If it comes out clean or with just a few crumbs, your rolls are done. If it's sticky or wet, they need more time in the oven.
Storing/Freezing Banana Rolls
Storing
Room Temperature: If you plan on eating the rolls within a day or two, storing them at room temperature is your best bet. Simply place them in an airtight container or tightly wrap them in plastic wrap or aluminum foil. Keep them in a cool, dry place away from direct sunlight.
Refrigerator: For a slightly longer storage period—up to a week—I recommend storing the rolls in the refrigerator. Again, use an airtight container or wrap them tightly in plastic wrap or aluminum foil to maintain freshness. The chill will slow down the staling process and keep them moist. Before eating, you can reheat them in a 350°F (175°C) oven for about 5 minutes to get that fresh-baked taste and texture back.
Freezing
Wrap Individually: If you want to store the rolls for an extended period, say a month or two, freezing is the way to go. I like to wrap each roll individually in plastic wrap. This makes it easy to grab just one or two rolls when the craving hits.
Seal Them Up: After individually wrapping them, place the rolls in a Ziploc bag or an airtight container. Before sealing, try to remove as much air as possible to prevent freezer burn.
Thawing and Reheating: When you're ready to enjoy the rolls, there are two ways to go about it. You can either let them thaw naturally at room temperature, which takes about 2-3 hours, or for quicker results, you can use the defrost function on your microwave. Once thawed, a quick stint in a preheated 350°F (175°C) oven for about 5 minutes will make them taste like they're fresh out of the oven.
Recipe

Butter Banana Rolls
Equipment
- 1 large mixing bowl
- 1 medium mixing bowl
- 1 small mixing bowl
- 9x13-inch baking pan
- Rolling Pin
- Knife or pizza cutter
- Electric mixer or hand whisk
- Oven
Ingredients
For the Dough:
- 1 package about 2 ¼ teaspoons active dry yeast
- 1 cup warm milk about 110°F
- ¼ cup granulated sugar
- ¼ cup unsalted butter melted
- 1 egg beaten
- ½ teaspoon salt
- 4 cups all-purpose flour
For the Filling:
- 3 ripe bananas mashed
- ½ cup unsalted butter melted
- 1 cup brown sugar
- 2 teaspoons cinnamon
For the Glaze:
- 1 cup powdered sugar
- 2 tablespoons milk
- 1 teaspoon vanilla extract
Instructions
Prepare the Dough:
- In a large mixing bowl, combine the yeast, warm milk, and granulated sugar. Let sit for about 5 minutes until frothy.
- Add the melted butter, beaten egg, and salt to the yeast mixture. Mix well.
- Gradually add in the flour, mixing until a dough forms.
- Knead the dough on a floured surface until smooth and elastic, about 5-10 minutes.
- Place the dough back into the bowl, cover with a damp cloth, and let rise in a warm area for 1-1.5 hours or until doubled in size.
Preheat and Prepare Pan:
- Preheat the oven to 350°F (175°C).
- Line a 9x13-inch baking pan with parchment paper.
Prepare the Filling:
- In a medium mixing bowl, combine the mashed bananas, melted butter, brown sugar, and cinnamon.
Assemble the Roll:
- Roll out the risen dough on a floured surface into a rectangle approximately 12x18 inches.
- Spread the banana filling evenly over the dough.
- Roll the dough tightly along the longer edge to form a log.
- Cut the log into 12 equal pieces using a knife or a pizza cutter.
- Place the rolls into the prepared baking pan.
Bake:
- Bake for 25-30 minutes or until the rolls are golden brown on top.
Prepare the Glaze:
- In a small bowl, whisk together the powdered sugar, milk, and vanilla extract.
Finish and Serve:
- Drizzle the glaze over the warm rolls.
- Serve immediately, optionally with whipped cream or vanilla ice cream.
Nutrition
Butter Banana Rolls - FAQ
Yes, you can use instant yeast. The main difference is that you won't need to proof it first—you can directly add it to your flour mixture. However, the rising times may be slightly shorter, so keep an eye on your dough.
You can, but the texture will be denser and the flavor slightly nuttier. If you're new to whole wheat, you might want to start by substituting only half of the all-purpose flour to see how you like it.
A few factors could be at play here: your yeast might be expired, the milk could have been too hot or too cold, or the environment might not have been warm enough for the dough to rise. Make sure your yeast is fresh and your milk is at the right temperature.
Absolutely! You can prepare the rolls up to the point of slicing them and placing them in the baking pan. Cover tightly and store in the fridge overnight. You'll need to add a few extra minutes to the baking time the next day.
f bananas aren't your thing, you can try using apple sauce, pumpkin puree, or even mashed sweet potatoes. Just keep in mind that the texture and sweetness will vary.
Of course! Chopped walnuts or pecans would add a lovely crunch, and chocolate chips could add a sweet surprise. Just be mindful not to overload the filling, or rolling the dough may become challenging.
If the glaze is too thick, add a teaspoon of milk at a time until you reach your desired consistency. If it's too thin, add a tablespoon of powdered sugar at a time until it thickens to your liking.
George says
Great recipe.
Michael Whiting says
thank you
Jennifer Naples says
I'm not that practiced at baking but, they came out great. 🙂