


Jump to:
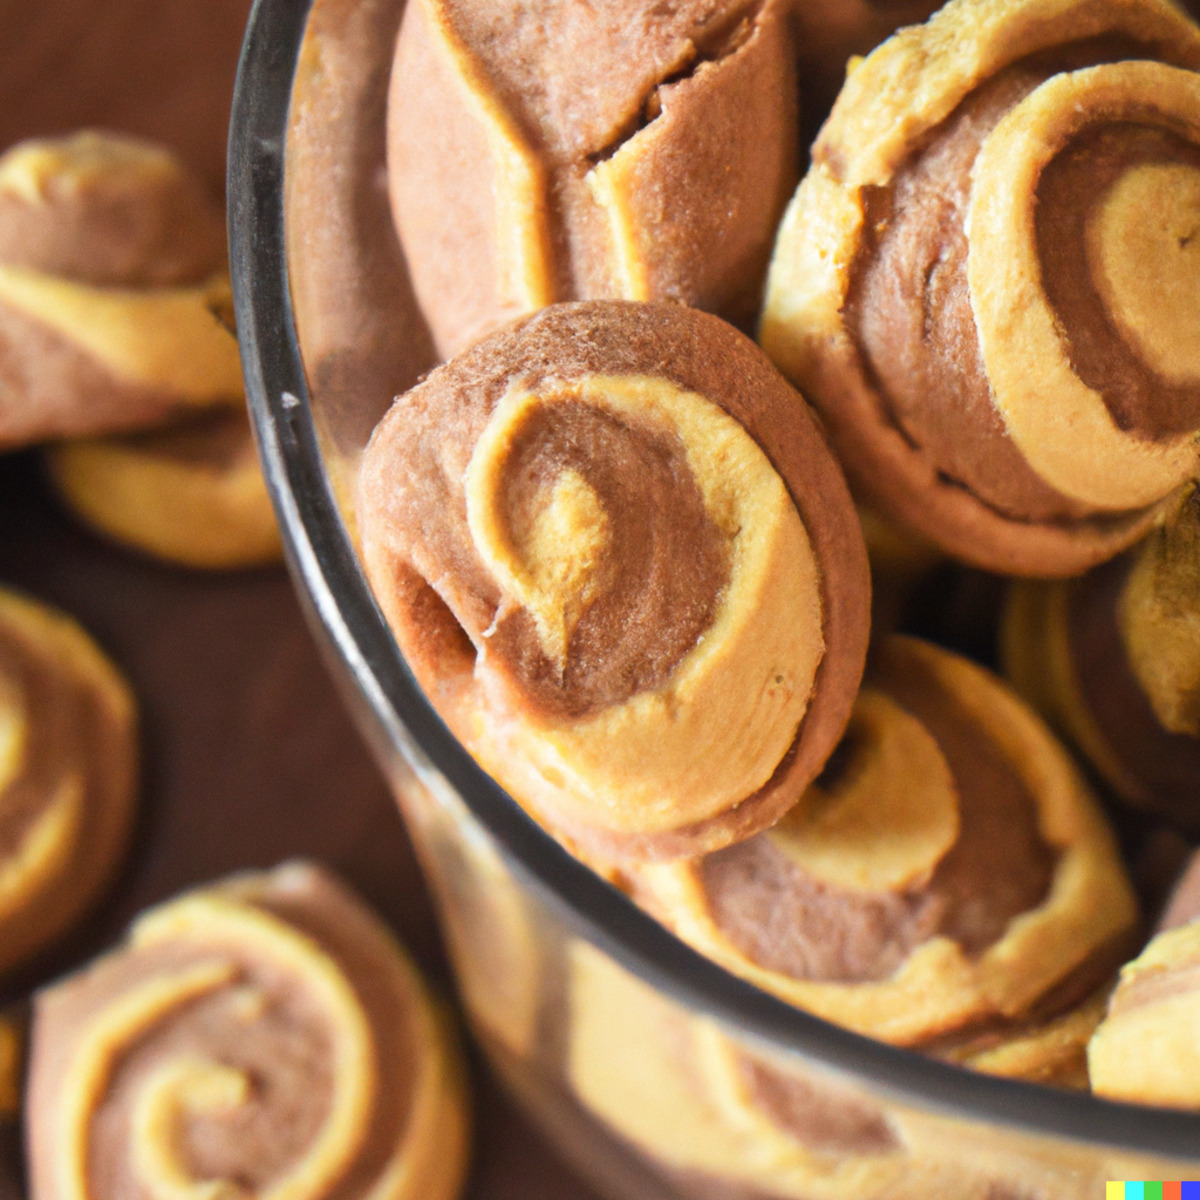
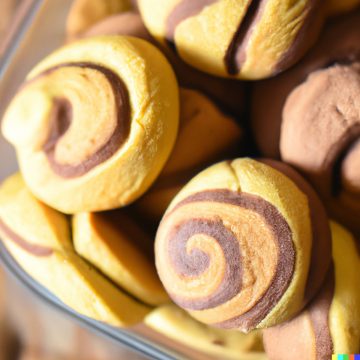
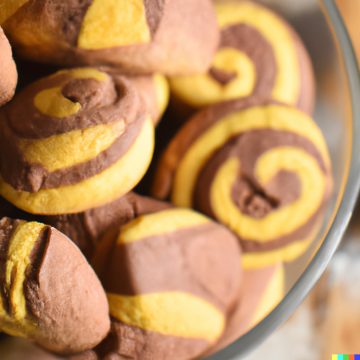
Oh, sweet friends, are you even ready for the magic that is the Cookie Butter Swirl Cookies? Imagine the comforting embrace of a classic cookie, but with a twist that will make your taste buds dance. That twist? The dreamy, spiced allure of cookie butter. It's like a cozy sweater for your soul but in cookie form.
These Cookie Butter Swirl Cookies are the kind of treat that you'd want to curl up with on a chilly evening, a cup of tea in hand, and maybe a good book or your favorite show playing in the background. The swirl design isn't just for the 'gram; it ensures every bite is a perfect harmony of classic cookie and that unique cookie butter charm. Dive in, and let's make your cookie dreams come true!
Why You'll Love This Recipe
- Unforgettable Flavor Fusion: The melding of classic cookie goodness with the spiced, creamy notes of cookie butter? It's a flavor match made in dessert heaven.
- Picture-Perfect Swirls: These aren’t just any cookies. The mesmerizing swirls make them a showstopper, perfect for impressing at gatherings or just treating yourself.
- Simple Yet Sophisticated: While these cookies have a gourmet feel, the recipe is straightforward, making it accessible for both newbie bakers and seasoned pros.
- Versatility is Key: Serve them at holiday parties, gift them in a pretty tin, or enjoy them solo with a mug of steaming cocoa. Their adaptability is part of their charm.
- Texture Heaven: The soft, chewy center complemented by slightly crispy edges ensures a textural delight with every bite. It's the kind of cookie that makes you close your eyes in sheer appreciation.
Substitutions: Making It Work For You
Butter Swap: If you're out of unsalted butter or looking for a healthier twist, coconut oil can be a great alternative. It'll give your cookies a slight tropical hint.
Sugar Choices: While the blend of granulated and brown sugar gives these cookies their signature depth, feel free to use all of one type if that's what you have on hand. Coconut sugar can also be a more natural alternative, though it'll darken your cookies a bit.
Egg Alternatives: For our vegan friends or those with allergies, flax eggs can be your go-to. Mix 1 tablespoon of ground flaxseed with 2.5 tablespoons of water for each egg.
Flour Flexibility: If you're gluten-free, a 1:1 gluten-free baking flour can be used. For a nuttier flavor, try half almond flour and half all-purpose.
Cookie Butter Choices: Can't find cookie butter? Almond or cashew butter with a pinch of cinnamon can mimic that spiced flavor. It won't be identical, but it'll be delicious in its own right.
How to Make: Cookie Butter Swirl Cookies Magic
1. Set the Stage:
Start by preheating your oven to that golden 350°F (175°C). This is the cookie sweet spot. Line those baking sheets with parchment paper or silicone mats. It's like giving your cookies a little non-stick hug.
2. Creamy Dreamy Beginnings:
In your trusty mixing bowl, get that butter, granulated sugar, and brown sugar all cozy and creamed together. You're looking for a smooth, dreamy blend.
3. The Egg-Vanilla Waltz:
One at a time, let those eggs dance into the mix, followed by a splash of pure vanilla essence. It's a simple step, but oh-so-crucial for that classic cookie taste.
4. The Dry Mix-In:
In a separate bowl, whisk together your flour, baking soda, and that pinch of salt. Gradually introduce this to your buttery base. Mix but don't overmix; we want tender cookies, not bread!
5. The Star of the Show:
Now, for the magic touch. Gently fold in that mesmerizing cookie butter. Remember, streaks are good! It's like creating edible art. And if you're feeling extra, toss in those optional chocolate chips.
6. Scoop, Drop, and Await the Magic:
With your cookie scoop or trusty spoons, drop dollops of dough onto your prepared sheets. Give them space; they like to spread out a bit. And for that gourmet touch, sprinkle a hint of flaky sea salt on top.
7. Bake to Perfection:
Pop them in the oven and let them bake for 10-12 minutes. You're looking for lightly golden edges and a soft, inviting center.
8. Patience, Cookie Lover:
Once out of the oven, let them sit and firm up for about 5 minutes on the baking sheet. Then, transfer to a cooling rack and let them achieve their final, delectable form.
Tips and Tricks: Perfecting Your Cookie Butter Swirl Cookies Game
- Chill Out: If you have some extra time, consider chilling the dough for at least 30 minutes before baking. This helps the cookies maintain their shape and can intensify the flavors.
- Even Scoops: Using a cookie scoop ensures that all your cookies are of uniform size, which means they'll bake evenly. No more guessing!
- Parchment Paper is Your Friend: Not only does it make cleanup a breeze, but it also ensures your cookies won’t stick to the baking sheet.
- Watch the Clock: Every oven is a bit different. Start checking your cookies a minute or two before the suggested baking time to ensure they don't overbake.
- Storage Smarts: Keep your cookies fresh by storing them in an airtight container. If you want to savor them over time, these cookies freeze beautifully. Just let them cool completely before popping them into the freezer.
- Boost the Butter: For an extra layer of flavor, consider browning the butter before adding it to the mix. This will give your cookies a nutty, caramelized depth.
- Mix It Up: Feel free to add in some of your favorite mix-ins, like chopped nuts or dried fruits, to give these cookies a personal touch.
- Cooling Counts: Letting your cookies cool on the baking sheet for a few minutes before transferring them to a cooling rack helps them set, ensuring the perfect texture.
Storing & Freezing: Keeping Your Cookies Fresh
Storing Freshly Baked Cookies:
- Cool Completely: Before storing, ensure your cookies have cooled completely on a cooling rack. This prevents them from becoming soggy due to trapped steam.
- Airtight is Right: Use an airtight container to keep your cookies fresh. Layer them between sheets of parchment or wax paper to prevent sticking.
- Room Temperature: Store your container at room temperature. Properly stored, these cookies will stay fresh for 5-7 days.
Freezing Cookie Dough:
- Scoop First: Use a cookie scoop or spoon to portion out individual cookie dough balls onto a baking sheet.
- Flash Freeze: Place the baking sheet in the freezer for 1-2 hours or until the cookie dough balls are solid.
- Bag It Up: Transfer the frozen dough balls to a resealable freezer bag or airtight container, squeezing out as much air as possible.
- Label and Date: Always label your bag or container with the date and type of cookie for easy identification. The dough can be frozen for up to 3 months.
Freezing Baked Cookies:
- Cool Completely: Ensure cookies are completely cooled before freezing.
- Layer Wisely: Place cookies in a single layer on a baking sheet and flash freeze for about an hour. This prevents them from sticking together.
- Pack and Stack: Transfer the frozen cookies to a resealable freezer bag or airtight container, placing parchment or wax paper between layers.
- Label and Date: As with the dough, always label and date. Baked cookies can be frozen for up to 3 months.
Reheating & Enjoying:
- From the Freezer: For the best texture and flavor, let frozen cookies thaw at room temperature for several hours or overnight.
- Warm Touch: If you prefer your cookies a bit warm, you can reheat them in a 300°F (150°C) oven for about 5 minutes.
Recipe
Cookie Butter Swirl Cookies
Equipment
- Electric mixer (or a wooden spoon)
- Baking sheets
- Parchment paper or silicone baking mats
- Cookie scoop or two spoons
Ingredients
- 1 cup 2 sticks unsalted butter, softened
- ¾ cup granulated sugar
- ¾ cup brown sugar packed
- 2 large eggs
- 1 teaspoon pure vanilla extract
- 2 ½ cups all-purpose flour
- 1 teaspoon baking soda
- ½ teaspoon salt
- 1 cup cookie butter store-bought or homemade
- ½ cup semi-sweet chocolate chips optional
- Flaky sea salt for sprinkling optional
Instructions
- Preheat Oven: Preheat your oven to 350°F (175°C). Line your baking sheets with parchment paper or silicone baking mats.
- Cream Butter and Sugars: In the large mixing bowl, cream together the softened butter, granulated sugar, and brown sugar until smooth and well combined.
- Add Eggs and Vanilla: Beat in the eggs one at a time, then stir in the vanilla extract.
- Dry Ingredients: In a separate bowl, whisk together the flour, baking soda, and salt. Gradually add this mixture to the butter mixture and mix until just combined.
- Cookie Butter Swirl: Gently fold in the cookie butter, ensuring you don't mix it in completely. You want to see streaks of cookie butter throughout the dough. If using, fold in the chocolate chips.
- Scoop and Bake: Using a cookie scoop or two spoons, drop dough onto the prepared baking sheets. Ensure there's enough space between each cookie as they will spread. Optionally, sprinkle a tiny pinch of flaky sea salt on top of each cookie.
- Bake: Place in the oven and bake for 10-12 minutes, or until the edges are lightly golden. The center should still be soft.
- Cool: Remove from the oven and let the cookies cool on the baking sheet for about 5 minutes before transferring them to a cooling rack to cool completely.
Nutrition
Cookie Butter Swirl Cookies - FAQ
Absolutely! Homemade cookie butter can bring a unique and fresh flavor to the cookies. Just ensure it has a smooth consistency similar to store-bought versions for the best results.
If your dough feels too sticky, you can chill it in the refrigerator for about 30 minutes to an hour. This will make it easier to handle and help the cookies hold their shape while baking.
The edges of the cookies should be lightly golden, while the center remains soft. Remember, they'll continue to set as they cool, so it's better to err on the side of underbaking than overbaking.
Of course! Feel free to customize the cookies with your favorite mix-ins. Just be mindful not to overload the dough, or the cookies might not hold together well.
Cookies spread due to the melting butter. If they're spreading too much, your dough might be too warm. Chill it for a bit before baking. If they're not spreading enough, your dough might be too cold, or you might have used too much flour. Let the dough sit at room temperature for a few minutes before baking.
Yes, you can! Press the dough into a greased or parchment-lined baking dish and adjust the baking time accordingly. Keep an eye on them and do the toothpick test: if it comes out with a few crumbs (not wet dough), they're done.

Ashley says
Great Cookie Recipe 🙂
Michael Whiting says
Thank You