


Jump to:
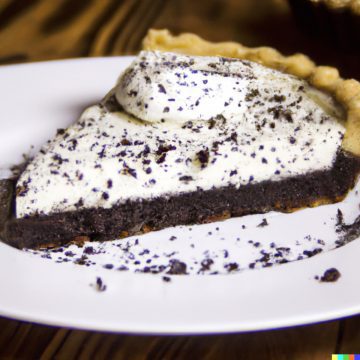
The first time I made Oreo Cloud Pie, it felt like the clouds had parted just to share their secret recipe for pure bliss. Imagine a dessert that walks the fine line between indulgent richness and airy lightness, balancing the dark, unmistakable flavor of Oreo cookies with the ethereal fluffiness of whipped cream and cream cheese. It's a luxurious yet simple dessert that takes you to cloud nine from the first bite. And the best part? You don't need to be a seasoned baker to whip up this piece of heaven.
Gather your ingredients and your electric mixer; you're only 30 minutes of prep and a few hours of chilling away from a slice of paradise. Whether you're hosting a gathering or just looking to spoil yourself, the Oreo Cloud Pie is an unapologetic celebration of all things creamy, crunchy, and utterly delicious. With a crumbly Oreo crust that gives way to a luscious cream cheese and whipped cream filling, each mouthful is a symphony of textures and flavors. Add a drizzle of chocolate syrup to heighten the experience, if you dare. Trust me, one slice and you'll understand why it's called Oreo Cloud Pie—it's simply heavenly.
Why You'll Love this Recipe
- Unbelievably Creamy: The blend of cream cheese and whipped cream creates an ultra-creamy filling that's light as air, making each bite melt in your mouth.
- Crunchy Oreo Goodness: With a crust and topping made from crushed Oreo cookies, this pie offers that perfect Oreo crunch we all love, providing a delightful contrast to the creamy filling.
- No-Bake Convenience: No oven? No problem! This pie only requires about 30 minutes of prep time and a few hours in the fridge. It's a hassle-free dessert that looks and tastes like you spent all day on it.
- Versatile and Customizable: Feel free to add your own twist! Drizzle some chocolate or caramel syrup on top, or even mix in some mini chocolate chips or chopped nuts into the filling. This pie is a great canvas for your culinary creativity.
How to Make Oreo Cloud Pie
Making this Oreo Cloud Pie is a breeze, and I'll walk you through it step-by-step. Trust me, you'll be in dessert heaven in no time!
Start with the Crust: First, I grab 25 Oreo cookies and toss them—filling and all—into a zip-top bag. Then, I take a rolling pin and crush those cookies until I'm left with fine crumbs. I pour these crumbs into a mixing bowl, add melted butter, and give it a good stir. After everything's nicely combined, I press this mixture into a 9-inch pie dish to form the crust. I then set it aside for later.
Make the Filling: Now for the creamy goodness! I take a package of softened cream cheese and beat it with an electric mixer until it's as smooth as silk. To this, I add granulated sugar and a splash of vanilla extract, mixing until it's all well-incorporated. In a separate bowl, I whip up some heavy cream, adding powdered sugar as I go, until I get stiff peaks.
Combine and Customize: Carefully, I fold the whipped cream into the cream cheese mixture. Once it's a unified, cloud-like mass, I crush 10 more Oreos—this time without the filling—and fold these into the mix. This gives the filling that extra Oreo kick.
Assemble and Chill: I pour this heavenly filling into my prepped Oreo crust and smooth it out with a spatula. Into the fridge it goes for at least 3 to 4 hours. I want it to set properly, so it slices like a dream.
Tips and Tricks for the Perfect Oreo Cloud Pie
Use Room-Temperature Cream Cheese: One of the secrets to that ultra-creamy filling is to use cream cheese that has been softened to room temperature. This ensures that it mixes smoothly with the sugar and whipped cream, eliminating any lumps.
Upgrade Your Crust: If you're looking to make the crust a little extra special, try adding a tablespoon of granulated sugar or a pinch of cinnamon to the Oreo crumbs and butter mixture. It adds a subtle complexity that pairs wonderfully with the creamy filling.
Whip to Perfection: When whipping your heavy cream, make sure to stop as soon as you reach stiff peaks. Over-whipping can make it too thick and harder to fold into the cream cheese mixture, affecting the pie's overall texture.
Use a Pie Shield or Foil: If you find that the edges of your crust are browning too quickly when you're setting it, consider using a pie shield or some aluminum foil to protect them. Although this is a no-bake recipe, some people like to set their crust briefly in the oven, and protecting the edges can be beneficial.
Time is Your Friend: Don't rush the chilling process; letting the pie set in the refrigerator for at least 3 to 4 hours helps it firm up, making it easier to slice and serve.
Get Creative with Toppings: This pie is wonderfully versatile. You can add a variety of toppings like chocolate chips, a dollop of whipped cream, or even some fresh fruit like strawberries or bananas for an extra layer of flavor and texture.
Freezing and Storing
Storing for Short-Term: If you're planning on enjoying the pie over the next couple of days. Simply cover it tightly with plastic wrap or place it in an airtight container. Keep it in the refrigerator to maintain its freshness and delightful texture. It's best consumed within 2 days.
Freezing for Long-Term: If you find yourself with more pie than you can consume in the short term—or if you want to prepare this dessert ahead of time—freezing is a fantastic option. Wrap the pie tightly in plastic wrap, ensuring all edges are sealed. Follow this with an additional layer of aluminum foil to protect against freezer burn. Store in the freezer for up to one month.
Recipe
Oreo Cloud Pie
Equipment
- 9-inch pie dish
- Electric mixer
- Rubber spatula
- Rolling Pin
- Knife for cutting the pie
Ingredients
- 35 Oreo cookies keep the filling, divided into 25 for the crust and 10 for the filling and topping
- 6 tablespoons unsalted butter melted
- 1 package 8 oz cream cheese, softened
- ⅓ cup granulated sugar
- 1 teaspoon vanilla extract
- 2 cups heavy cream
- 1 cup powdered sugar
- Optional: chocolate syrup for drizzling
Instructions
- Start by making the crust: place 25 Oreo cookies (with filling) in a zip-top plastic bag. Use a rolling pin to crush the cookies into fine crumbs.
- Pour the crumbs into a mixing bowl, add the melted butter, and stir until the crumbs are evenly coated.
- Press the crumb mixture into the bottom and up the sides of the pie dish. Set aside.
- In a large mixing bowl, beat the softened cream cheese with an electric mixer until it's smooth and creamy.
- Add the granulated sugar and vanilla extract to the cream cheese and beat until well combined.
- In another bowl, beat the heavy cream until it starts to thicken. Add the powdered sugar and continue to beat until stiff peaks form.
- Gradually fold the whipped cream into the cream cheese mixture until it’s fully incorporated.
- Crush the remaining 10 Oreos (remove the filling this time) and fold them into the cream cheese and whipped cream mixture.
- Pour the filling into the Oreo crust, spreading it evenly with a spatula.
- Chill the pie in the refrigerator for at least 3-4 hours, or until set.
- Just before serving, sprinkle the top of the pie with the crushed Oreo fillings saved from step 8. Optional: drizzle with chocolate syrup for an extra touch of decadence.
- Slice the Oreo Cloud Pie and serve it chilled. Enjoy the heavenly mix of textures and flavors!
Notes
Nutrition
Oreo Cloud Pie - FAQ
Yes, you can use low-fat cream cheese and a lighter whipped topping if you're looking to cut some calories. For a non-dairy version, there are plant-based cream cheeses and whipping creams available. Just note that the texture and flavor may vary slightly.
You can make this pie up to 2 days in advance if you're storing it in the refrigerator. If you're planning to freeze it, you can make it up to a month in advance.
The filling may be runny if the cream cheese wasn't fully softened or if the heavy cream wasn't whipped to stiff peaks. Make sure to follow each step carefully for the best results. If your filling still turns out too soft, you can pop it into the freezer for a bit to firm it up before serving.


Taylor Ott says
I love no bake deserts 🙂